
Table of Contents
- Understanding IWB Carry Positions and Comfort Basics
- Leather Holster Break-In Guide for All-Day Wear
- How to Adjust Holster Cant and Ride Height
- Choosing the Right Gun Belt for IWB Carry
- Clothing Selection and Layering for Concealment
- Best Appendix Carry Leather Holster Setup
- Troubleshooting Common Discomfort Issues
- Conclusion
- Frequently Asked Questions
Last Updated: October 1, 2026
Understanding IWB Carry Positions and Comfort Basics
Inside-the-waistband (IWB) carry is the practice of wearing a concealed handgun inside your pants or waistband rather than on the outside. The goal is simple: keep your firearm secure, accessible, and hidden. But comfort is where most people struggle.
How to wear an IWB leather holster comfortably starts with understanding your body geometry. A position that works for your friend might create pressure points or printing issues for you.

IWB carry happens at three main positions: strong-side hip (3-5 o'clock), appendix carry (12-2 o'clock), or rear waistband. Each distributes weight differently and demands different adjustments.
Comfort depends on four things: the right holster, proper adjustment, appropriate clothing, and a break-in period. Get all four right and you forget you're carrying.
Leather Holster Break-In Guide for All-Day Wear
Break-in is two parallel processes: leather molding and physical adaptation. New leather is stiff, and your body needs time to adapt to carrying weight at your waistband.
Full-grain leather takes 1-2 weeks of regular wear to break in. During this time, the leather softens and conforms to your body shape. Simultaneously, your hips, lower back, and core muscles adapt to the distributed weight. This physical adaptation varies dramatically by body type.
Timeline by body type:
Athletic or lean frames (BMI under 25): Hip bones are more prominent and may create pressure points faster. Expect 7-10 days for leather softening; physical adaptation takes 2-3 weeks. Start with 2-3 hour sessions and gradually extend.
Average frames (BMI 25-30): Leather softens in 1-2 weeks; physical adaptation completes in 2-3 weeks. Broader waistband distributes weight more evenly.
Larger frames (BMI over 30): Wider waistband distributes weight better, but leather takes 10-14 days to soften fully due to increased contact pressure. Physical adaptation may extend to 3-4 weeks.
What to expect during break-in:
- Days 1-3: Leather feels stiff; mild rib or hip bone pressure is normal.
- Days 4-7: Leather softens; pressure points ease but lower back fatigue may appear as your core adapts.
- Days 8-14: Leather reaches comfortable flexibility; chafing resolves. If lower back fatigue worsens, adjust cant or ride height.
- Week 3+: Leather is fully broken in and feels custom-fitted. Carrying feels natural.
Physical conditioning during break-in:
Simple stretches accelerate adaptation and reduce discomfort:
- Hip flexor stretch: Lunge position, 30 seconds per side, twice daily.
- Cat-cow stretch: On hands and knees, alternate between arching and rounding your spine, 10 repetitions.
- Glute activation: Bodyweight squats or glute bridges, 2 sets of 10 reps daily.
These five-minute routines noticeably reduce fatigue by day 5-7.
Wear schedule for optimal break-in:
During break-in, wear your holster in graduated sessions:
- Week 1: 2-3 hours per session, 4-5 days per week. This lets leather adapt gradually without creating excessive pressure.
- Week 2: 4-6 hours per session, 5-6 days per week. Your body is adapting; extend wear time as comfort improves.
- Week 3+: Full-day wear (8+ hours). By now, leather is soft and your body has adapted.
If you jump to all-day wear on day one, you'll create unnecessary pressure points and muscle fatigue that can last weeks.
Leather conditioning during break-in:
For pressure areas, apply leather conditioner once weekly using a dime-sized amount. Over-conditioning weakens leather and reduces retention. For persistent chafing, condition the spot and consider adding moleskin to the inside of the holster.
How to Adjust Holster Cant and Ride Height
Cant is the forward or backward angle of your holster; ride height is how high or low it sits on your waistband. Cant typically ranges from 0 to 15 degrees forward. Most IWB holsters sit at 10-15 degrees, improving concealment and draw speed. Higher ride height hides more of the gun but can create rib pressure; lower ride reduces rib pressure but requires more concealment from clothing.
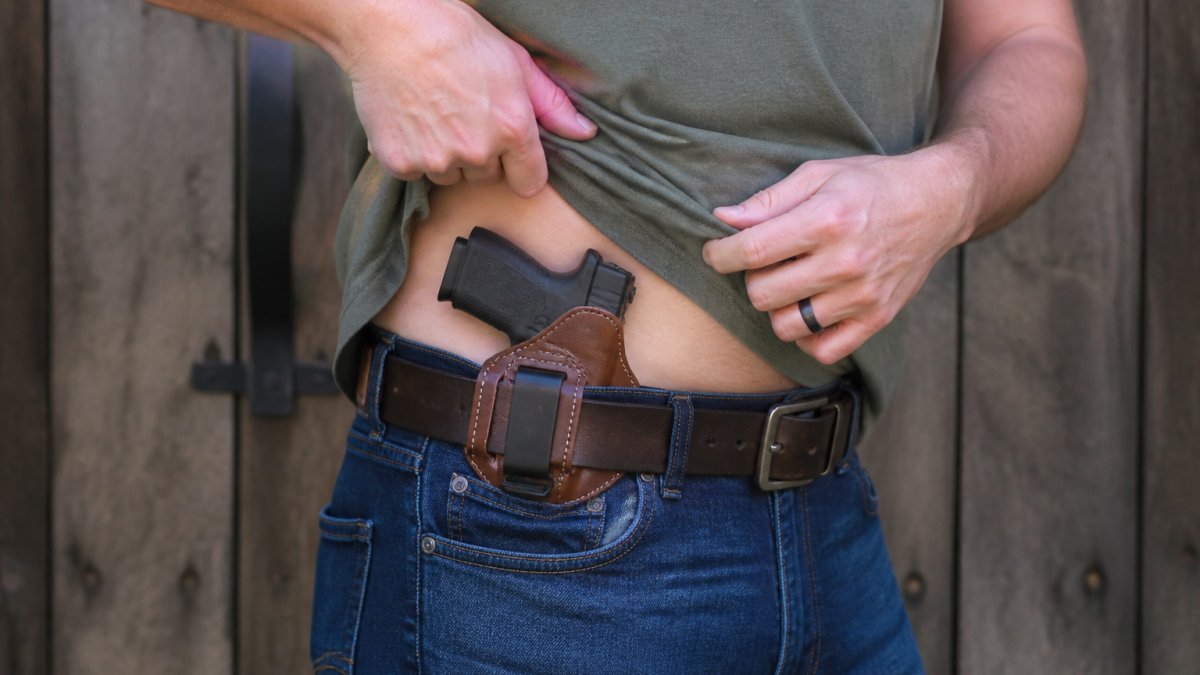
- Start with manufacturer defaults. Wear for 2-3 days before adjusting.
- Identify pressure points. Your ribs, hip bone, or lower back tells you what needs adjustment.
- Adjust cant first. If the gun prints forward, increase cant; if it digs into ribs, decrease cant. Small 1-2 degree changes make real differences.
- Then adjust ride height. Move up for more concealment, down for rib pressure relief.
- Test in realistic conditions. Sitting, bending, driving, and reaching should feel natural.
Most people find their sweet spot within a week.
Choosing the Right Gun Belt for IWB Carry
A standard leather belt stretches and sags, failing to support a holstered firearm for eight hours. A proper gun belt is rigid, stays in place, and distributes weight evenly. When your belt sags, your holster sags with it, changing ride height, shifting cant, and creating new pressure points.
The HOSS IWB Leather Holster, CCW Holster, Leather Holster, Universal Holster →
Look for belts that are:
- 1.5 inches wide minimum to spread weight and reduce pressure points.
- Double-ply or reinforced construction for rigidity.
- Full-grain leather that holds its shape and improves with age.
- Secure fastening with locked buckles or snap closures.
At AnchorsAweighLeather, we understand that a proper gun belt is foundational to comfortable IWB carry. A belt that sags creates problems your holster can't fix. Pair a quality leather holster with a rigid, well-made gun belt and you've solved half your comfort equation.
Clothing Selection and Layering for Concealment
What you wear over your holster matters as much as the holster itself. Printing happens when your shirt outlines the gun's shape. Loose-fitting shirts work best for IWB carry; they flow away from your body and hide the holster's profile.
Layering is your best tool for both concealment and comfort:
- Base layer: A fitted undershirt keeps sweat off the holster and reduces chafing.
- Middle layer: A looser shirt or light jacket hides printing and adds comfort.
- Outer layer: A coat or heavier jacket provides maximum concealment in cold weather.
In warm weather, wear untucked button-ups or loose-fitting t-shirts that are at least one size larger than your normal fit. The extra fabric drapes away from your body and hides the holster's profile.
For appendix carry, you need slightly looser fit in the front. For strong-side hip carry, looser fit on the side and back works. Adjust your clothing strategy to match your carry position.
Dark colors hide printing better than light colors. Busy patterns also help.
Best Appendix Carry Leather Holster Setup
Appendix carry positions your holster at 12-2 o'clock, distributing weight across your core rather than pulling on one side. It requires higher ride height and 15-20 degrees forward cant to prevent muzzle-down angles when sitting. The setup includes high ride height, forward cant, proper retention, and a sweat guard. Appendix carry works best for compact or subcompact handguns; larger guns create bulk and printing issues.
Troubleshooting Common Discomfort Issues
Even with proper setup, discomfort happens. But discomfort is diagnostic. It tells you whether your adjustment is off by degrees or whether your body geometry and carry position are fundamentally mismatched. Here's how to diagnose and fix the most common problems, and when to accept that a different position might suit you better.
Rib pressure during sitting or bending:
Lower back pressure or fatigue during sitting:
Hip bone pressure:
Chafing or skin irritation:
Printing (gun outline visible through shirt):
Holster movement or shifting during the day:
When to accept a position change:
Conclusion
Learning how to wear an IWB leather holster comfortably is a process, not a single decision. It starts with understanding your body geometry and carry position. It continues through proper break-in, precise cant and ride height adjustments, and the right clothing choices.
Frequently Asked Questions
Does a leather holster need a break-in period?
Yes. A full-grain leather IWB holster requires a break-in period to mold to your body and firearm. Expect 1-2 weeks of regular wear before the leather softens and conforms properly. During break-in, wear the holster for short periods initially, then gradually extend to all-day carry. This gradual process prevents chafing and allows the leather to develop a custom fit that improves comfort significantly over time.
What is the most comfortable position to carry an IWB holster?
Comfort depends on body type and lifestyle. Strong-side hip (3-4 o'clock) works well for most body types and offers good concealment under jackets. Appendix carry (12-2 o'clock) suits slimmer builds and provides faster draw access but requires careful cant adjustment and clothing selection. Experiment with both positions and adjust ride height and cant angle to match your body geometry. The right position balances concealment, accessibility, and weight distribution for your specific frame.
How do I make my IWB leather holster more comfortable?
Start with proper holster fit and a quality gun belt that won't flex under the weight. Adjust ride height so the muzzle sits just below your waistband, and set cant angle to match your natural draw stroke (typically 15-20 degrees). Choose clothing with enough room to prevent printing without excessive bulk. During the break-in period, condition the leather lightly and wear the holster for increasing durations. If chafing occurs, add a sweat guard or adjust positioning. Quality full-grain leather like that used in handcrafted holsters becomes more comfortable as it molds to your body.
How should an IWB holster sit on your waistband?
The holster should sit snug against your body with the muzzle positioned just below your waistband. Ride height typically ranges from 0.5 to 1.5 inches below the belt, depending on your clothing and concealment needs. The holster clips should grip your waistband firmly without excessive pressure. When standing and moving, the holster should stay in place without shifting or rotating. The belt loops or clips must be positioned on sturdy belt material to prevent sagging. Proper positioning ensures retention, concealment, and comfort throughout the day.
0 comments